| Discover Life | Albums | IDnature guides | Global mapper | Search | Top |
New users
| Top |
 up or
up or
 down arrow
to move to the next character in that direction.
down arrow
to move to the next character in that direction.
 button and
then on a character's blue link from the alphabetical list of characters.
button and
then on a character's blue link from the alphabetical list of characters.
| Top |
 button to see what kinds match your choice. A list will appear on the left.
 that appears with your results on the left.
| Top |
| Top |
Building guides and checklists is a two step process that involves (1) putting information into eXtended markup language (XML) files and then (2) making database (db) files from the XML files. The XML files are text based and can be read and easily manipulated by humans, either with a text editor or with a set of Web-based building tools. The db files are used by the 20q software to run the guides quickly. They can't be read by text editors and are built with the "refresh" tool (see "Building tools" below).
Security
To use the building tools, first select a guide and then click on "Menu" in the top banner. The building tools are
displayed on the left. Everyone can use these tools to manipulate the XML files on the outside of a firewall.
However, only authorized users can make permanent changes to the XML files through a process
that involves email transactions or authorized IP addresses.
If email is used, the tools store changes on the outside of a firewall and send an email with a PIN number to a specified email account.
Permanent changes occur when the email with the PIN number is returned to the server and is authenticated against two files,
one containing authorized email and IP addresses (20q_ALLOW) and the other, the transaction PIN numbers (20q_MAIL_PIN). The system ignores
emails that are from accounts that are not authorized to change a specific guide or that contain a PIN number that is incorrect.
Guide builders who reply to an email must include the original text with the PIN number in their reply or it will be ignored.
Making changes is easier if the guide builder is working at authorized IP addresses. They simply use the tools and then "refresh"
to make the changes permanent.
Step 1: On Pick18 (original), go to your guide of choice
Step 2: Update the end of the url like this -- guide=Moth&email=youremail@blank.com
Step 3: Hit 'controls' and then enter
Step 4: You will receive an email with a pin
Step 5: Re-update the end of your guide url like this -- guide=Moth&email=youremail@blank.com&pin=1234
Guides versus checklists
A guide and its associated checklist share a single XML file and are built with the same tools.
However, they differ in which kinds of organisms they display.
We define a kind as a unique combination of an organism's name, morph, and sex.
To appear in a guide a kind must have at least one character-state. Kinds without any character-state attribute appear only in the checklist.
Guides distinguish between morphs and sexes. Checklists do not, listing only kinds with different names.
The order in which kinds are displayed in checklists has several options, is in flux, and is currently not documented.
Generally, kinds are listed alphabetically by scientific name; however, in some cases,
kinds may be listed in groups based on their "path," a variable that is set with the "score" tool (see "Building tools" below),
that generally reflect groups such as orders and families.
If you are an expert in a group and wish to build a guide or help with one, please contact John Pickering.
Process -- one of elimination
How to deal with unknown or unscored characters?
In cases where a character does not apply to a kind, we recommend that guide builders score "None",
rather than leaving the character unscored. For example, we recommend a single character "Leaf latex color"
with "None" and Red, White, Yellow, Clear, etc. This is more powerful
than two characters "Leaf latex present" with states of "Yes" and "No" and a character "Leaf latex color" without
a "None" character.
If a character is difficult, then the above rule can sometime lead to guide builders wanting to score
a kind for all states. From the users view, this is equivalent to leaving the kind unscored.
Building tools
The following tools appear on the left under "Menu."
To use a specific tool, click on the box to its left and then on the "submit" button above it.
Follow the instructions that appear in red after you select a tool.
HINT -- Use "score_if" rather than "score" to score a character once a guide is populated with kinds.
To score all kinds in a guide, (1) select score_if, (2) enter the character-state on the left,
(3) leave the four rules on the right at their default "any" setting, (4) click the "save" button, and
(5) once the changes are on the server, refresh.
You can import character-state information with header fields starting with CS (in capitals), followed by a colon,
and then the character's name. In the corresponding fields in subsequent lines, put the state. Thus,
Character & state conventions for choosing, naming, and presenting characters
In choosing characters and states, there are several considerations that stem from the advantages and limitations
of computer based identification. These are
When in doubt, spell it out. Thus, use
"Over 3 mm" not "> 3 mm". Similarly, use "Red and black" not "Red & black".
The newest version of 20q converts ampersand ( & ) to "and," less than ( < ) to "under," greater than ( > ) to "over,"
and percent sign ( % ) to "percent."
It blocks plus sign ( + ), semicolon ( ; ), grave accent ( ` ),
apostrophe ( ' ), quotation mark ( " ), vertical bar ( | ), asterick ( * ), question mark ( ? ), tilde ( ~ ),
caret ( ^ ), left parenthesis ( ( ), right parenthesis ( ) ), left square bracket ( [ ), right square bracket ( ] ),
left curly brace ( { ), right curly brace ( } ), dollar sign ( $ ), newline, and carriage return by converting them to spaces.
The equal sign ( = ) is a no-no; spell it out as "equals."
Templates
Use the "score" tool to create an _ALL_ ghost. Simply enter "_ALL_" in "scientific name" and save.
Use "drop" to remove it.
Warning: <include> tags may cause some confusion if a kind's XML is store
in a guide and also in any of its included guides. Two or more
copies of a kind will appear when "score" or "drop" are used if any of the following differ among XML files:
(1) authority, (2) easy name, (3) level, (4) common names, and (5) path. To have only one version of a kind appears, make
sure that these five variables are exactly the same across XML files. Or better yet, just put the kind in a single XML file.
Note: Guide buiders still need to use Unix to add and delete <include> tags.
Eventually they will be able to edit them from their browser with the "controls" tool under "Menu."
Further information
Guide users and builders may have to switch their thinking to work with IDnature guides.
Most other identification keys use a process of selection. In contrast, IDnature guides work by elimination.
This difference gives IDnature guides a fundamental advantage in the practical world where some questions can't be answered.
Antennae banded? Oops. They've been knocked off.
Most conventional keys are linear and are dichotomous. Users are forced to answer questions in order of presention,
typically selecting between two options. Failure to answer a question means failure to proceed or requires working the key in both directions,
hoping for later information that will help decide which answer to pick. Fortunately, interactive keys such as IDnature guides
are non-linear. Users can answer questions in any order. Failure to answer a question means only that the power provided by a particular answer
is lost. Users can skip any question and proceed with the next. In fact, users should skip all questions unless they are sure of the
answer. A wrong answer can eliminate the kind being identified from the guide. No answer leaves it in.
In the ideal world, guide builders should score every kind for at least one state of each character.
However, 20q is forgiving and doesn't require that all kinds have a state for all characters.
It will not eliminate a kind if it doesn't have a state for the character under consideration. In short, unscored characters
make the identification process less efficient. They do not affect the identification itself.
Builders should score all states that apply to a kind and should anticipate
user errors and score states so that they accept some variance and error in answers. For example,
for a plant that typically flowers in April, the guide builder may want to score
March and May too, thus bracketing for latitudinal, elevational, and between-year climatic influences.
Don't allow your users to exclude something that they shouldn't.
Before reading this next section, please familiarize yourself with
20q XML Tags & File Structure.
Note: Earlier versions required builders to refresh_guide & refresh_checklist. This tools combines both features.
Here are a few (tricky) examples to help you use this tool:
The form that appears has three sections:
If you wish to score just a subset of characters, you can group them together by setting them to be "initial characters" with
the "controls" tool. Also see Character-state naming conventions and
Templates below.
In the header section of "score," 20q presents guide builders with a number of boxes to link images, maps, and other information
to a kind. This is done with <link> tags
(see details).
These links are combined across morphs and sexes with the same <name> value.
Users see them in the order that they are stored in the XML file,
or files, if the first file uses <include> tags.
This tool reqires that you click on a box to the left of the list of names that appear below the tools.
If there is more than on kind associated with a name, you are present a choice of which to remove.
If you wish to remove both a male and a female, for example, you will need to use this tool twice.
This tool allows you to rename a kind to another name+morph+sex combination. Follow the instructions that appear in red.
Within the XML file, it replaces the old kind with a new one, maintaining the kind's order within the file.
It does not chance the authority or other tags.
In the "scientific name" box, a guide builder may put multiple names, selecting them with the check boxes
in the list that appears below the Building Tools under "Menu." Separate multiple names with commas.
If a species name, genus name, or group name, such as familiy, ends with an underscore, then the rule is applied not only
to the name but to all kinds that are members of in the named group. Names are checked against the
<name> and <path> tags.
Ending a specific name with an underscore applies the rule to the species and all its subspecies.
Examples:
Steps:
Unless a kind has already a state for the character, Step-4 will assign it the alternate state. For example, imagine you have a species
with green eyes, one with blue eyes, and the rest with black eyes. Use score_if to score character "Eye color" as state "Green" for
"Species 1." Then score "Eye color" as "Blue" for "Species 2." Then Refresh. Finally, score_if "Eye color" as "Black"
with the "character or state" rule "unless=Eye color". All kinds but the first two will be scored "Black."
Note: drop_if only removes a character from the kinds' attribute and not from the character in "c_initial".
Use the "controls" tool to remove c_initial characters.
Note: Doesn't rename a character in "c_initial". Use the "controls" tool to manage c_initial characters.
Features include: crop, rotate, mirror, sharpen, contrast, bright, saturate, hue, and draw.
The "draw" feature allows you to annotate character-state images with a circle or line of specified thickness and color.
You may specify a circle's size and a line's edge of origin with the options.
By default "edit_explain" links character-state images to _ALL_ rather than to a specific kind in the guide.
However, while not recommended, you may link a images to a kind by selecting one from the menu.
To remove an image, switch it "off" and then save.
Steps to adding text to the guide
From the Discover Life homepage:
1. Click on IDnature Guides.
2. Click on Guide you wish to make changes to.
3. Click on Menu at the top of the page.
4. Click on the first letter of the name of the genus you would like to work on within the menu frame, then click submit.
5. A list of genera will appear in alphabetical order by genus and species name.
6. Check the box next to the genus and species you would like to work on.
7. Scroll to the top, click edit text, then submit.
If you scroll down you will see fields such as overview, kinds,
identification, etc. When you are finished making your changes, click
save on the left side of the main frame. A screen will appear that says
"Thank you. Made changes on server." After this screen appears, hit
refresh on the left side of the screen in the menu area. This will take a
minute or two, as it has to refresh the entire guide.
If your IP address has not been authorized by Discover Life's system,
then the screen should say "Thank you.
Changes have been sent to [email address]." If this is the
message that appears, then the person who receives the email must reply
to the email with the original text included before the changes are made
on the server.
<who_default>
<email_default>
<base_path>
<levels_default>
<c_initial> -- initial characters
<include> -- Note: the "controls" tool doesn't yet allow guide builder to add and remove <include> tags.
TO ACTIVATE CHANGES -- The changes that you make with the "control" tool may not take effect until after you reply to the email,
use the "refresh" tool, and then start the guide again from scratch. Start the guide again by selecting "guides" in the banner
and then clicking on the guide. This is an exception. All other tools take effect after you click on "refresh" and then "Menu."
Output from the import tool is put in file="$guide.xml3", which, if correct, should be renamed to the guide's xml file ("$guide.xml").
To import information into 20q from a text file, the text file needs a header line followed by a line
for each kind that you wish to import. Your text file may be placed anywhere on the Web or can be emailed to Discover Life.
Its name should not contain spaces or special characters.
The header line should name the fields in the order that they appear in the rest of the file.
Fields may be separated by dollar signs, tabs, or commas,
but commas are not recommended, as they often are used within fields.
Lines should be separated by new line characters. Carriage returns are ignored. As an example:
path$name$authority$level$common_name$links$notes
is a header that would import these seven fields. The first two are required; the others optional.
If 'level' is not specified, it defaults to 'species'. Use semicolons to separate multiple common names and synonyms in
the 'common_name' field.
path$name$authority$common_name$CS:Wing number$CS:Leg number
is a header line that allows you to import two characters, "Wing number" and "Leg number."
Use a semicolon within the "common_name" field to separate multiple common names and synonyms.
Similarly, use semicolons to separate multiple polymorphic states within a CS:character field.
This tool is useful to check XML that has been created with a text editor. It does not appear under menu and
must be placed in the URL. For example, "http://www.discoverlife.org/20/q?guide=Whatever&act=xml3"
will process the XML file for a guide named "Whatever".
Choosing, naming, and presenting the appropriate characters and their states is the hardest part of building a guide.
Our goal is to use characters and states that the average 4th grade student can understand and recognize.
While in some cases it may be impossible to avoid technical terms, please try. Also please try to
avoid characters that require special equipment and methods that may not be generally available outside
of research instiututions. For the most part we hope that binoculars, a hand lense, or a school microscope
will be sufficent to successfully use the guides.
Conventional keys are typically dichotomous and present sets of two characters in a linear sequence.
In contrast, the order in which 20q presents characters depends on which states a user has already selected.
The software presents a special category of characters, initial characters, when the
guide is started. Initial characters appear in the order specified by the guide builder with the
"controls" tool (see above) and are listed in order of appearance in the XML file between
20q uses the following rules to order the states that it presents:
Thus, "Under 1, 1, 2 - 99, 100, Over 100, None" should work. As does "1 cm - 1 m, 1 m - 10m".
If units such as cm are the same in all states, put the unit once at the end of the character name rather than in all
of the state names. If state names need changing to take advantage of these rules, use the rename_if tool.
The index always lists characters alphabetically, even for the initial characters that are presented in
the order specified by the guide builder. To keep associated characters together and so that they are
easily looked up in the index, it is important to name them so that they index well. For example,
if you name a character "Wing number" rather than "Number of wings," it will group with other
"Wing" characters and not with other "Number" characters.
A major advantage on interactive keys is that they can have multiple states and are not dichotonous.
So the question is how many states to have per character. For practical reasons,
if images are going to illustrate a state, then we recommend that
a guide build aim to have 4 or 5 states per character. While there is no restriction on the number,
if there are too many, then the guides become more difficult to use. The human mind
is limited in the number of patterns it can recognize simultaneously. Too many states also require
the user to scroll from left to right, rather than seeing all states together.
To help guide builders consolidate states if there are too many, 20q provides a summary of how many kinds
have each state. This summary appears at the bottom on the left after clicking on "identify" before selecting any state.
To maximize the power of each character, try to consolidate states so that each remaining state contains an
equal proportion of the kinds. Thus, it is generally better to have 4 states that each describe 25 kinds,
than 1 state that describes 97 and 3 others describing a single kind.
Basic rule -- keep 'em short!!! Because there is limited space on monitor,
you should put as much of the character-state combination in the character name
and as little as possible in the state name.
Thus, "Thorns present"--"Yes"/"No" not "Thorns"--"Present"/"Absent."
And, for example, "Over 5" not "More than 5."
Because of the conventions computers use to communicate, 20q is limited in the set of symbols that
it allows in character and state names. It allows all letters ( a-z A-Z ), numbers ( 0-9 ), underscores ( _ ), hyphens ( - ), some punctuation,
such as spaces ( ), commas ( , ) and colons ( : ), and a few other symbols, including the divide or foreslash symbol ( / ).
We recommend that you only use these symbols.
20q can fail if characters and states contain
apostrophes, plus signs, equal signs, brackets, parentheses, ampersands, and other symbols.
20q distinuguishes between the case of letters. "Red and black" is a different state from "Red and Black".
As a convention, so that guides can exchange character-states and index correctly, we request that
guide builders start characters and states with a capital letter and do not use capital letters
elsewhere unless it is a name or required for emphasis.
The newest 20q versions automatically capitalize the first letter of new characters and states.
Note: Currently states are ordered by a sort routine that needs to be improved. The months, for example,
are presented alphabetically, rather than chronologically. In due course, we will improve the order
that characters are presented based on categories such as numerical, chronological, etc.
We recommend the following:
And keep it simple -- use "Thorax top pattern" to describe the pattern on the top of an insect's thorax, not "Mesoscutum dorsal pattern,"
as our earlier guides do!!!
Put text describing a state in a file with the same name as the
image file, except that instead of using a suffix such as ".mx.jpg", use ".txt".
Eventually we plan to put a tool under the Menu that will allow guide builders to add this text
via the Web. To see how txt files work, click on one of the thumbnails on
Insect orders,
a guide developed by Lucid. The text appears on the left, below the 240 pixel resolution image.
To help you build guides, share character-states with other guide builders, and score kinds rapidly,
IDnature guides use the following:
For further details on why and how to build guides and checklists, see
| Top |
For splitting existing guides:
| Top |
20q uses <image> tags to link images on the Web into the guides. While any image URL could theoretically be used to illustrate the guides, Discover Life and IDnature guides function better if guide builders follow the following conventions:
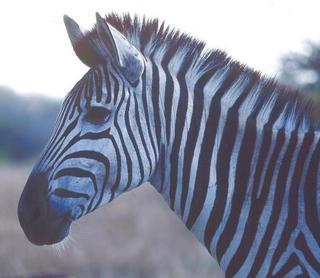
Our software automatically provides multiple links below photographs based on the Unique_image_identifier and Description. The Zebra image above is named "Equus_burchellii,I_JP2119_1.jpg" and links to a larger image and its metadata through the URL "https://www.discoverlife.org/mp/20q?see=I_JP2119". To help seach engines find this image, we put "Equus_burchellii" before the unique identifier in the image name.
For further instructions on putting images on Discover Life and in IDnature guides, please see
| Top |
|
Web services -- how to put our tools & content on your website
Discover Life provides web services to share its tools and content through other sites. Without seeking permission, any non-commercial website may customize links and forms in their pages to use the services described below. Commercial sites should not use them unless they have permission. Here we explain how to write HTML <a href...> tags (GET queries) and web forms <form...> (POST queries) to pull up Discover Life's images and other content from within your site. You can customize these queries so that Discover Life generates navigation bars that link back to your pages. Thus, your users can easily return to your pages after viewing Discover Life content. The basic principle is simple. You will use HTML to pass variables to Discover Life's servers that will then generate pages from our network of contributing databases. Each query will call a server and tell it what to do based on the variables you send.
Set &btxt, &burl, and &bi variables to customize navigation bars. These variables let you present information within your site's framework so that it is not obvious to your end-users that Discover Life is working behind-the-scene. Customized navigation bars return users to your site after they have viewed material from Discover Life. While we credit photograhers and other content providers, you can in effect hide Discover Life's role to end-users. We do this to encourage other sites to share our content widely. For partner sites that contribute information to Discover Life, we use a single variable, &b, that customizes our navigation bars and icons to match the look-and-feel of our partner's site. Please contact John Pickering if you wish us to set up this custom feature.
The following uses &btxt and &burl to link
http://www.your.org/page.html
to Your Organization in the tree guide's banner:
|
| Top |
|
Put IDnature guides on your Web pages
Non-commercial sites are welcome to put links to IDnature guides on their pages. Other sites must have permission before doing so. Before reading this section, please familiarize yourself with the overview and examples of how to use Discover Life's web services (see Web services overview).
|
| Top |
|
Linking to Discover Life's images and slide shows from your Web pages
Discover Life is assembling a collection of high-resolution images from our contributors that we encourage you to link to from other websites (see "Copyright and terms of use" below). We process and store our images at five resolutions, assigning each image a unique identifier. Here we explain how to call individual images, sets of images, make slide shows, view metadata associated with images, and change resolution. We assume that you are familiar with the overview and examples of using Discover Life's web services. If not, please goto Web services before continuing.
We give images integers as grades. Zero is the default for ungraded images. Negative grades switch images off so that they do not appear in species pages. Higher grades will appear before lower ones on the species pages. Thus, 3 is a better grade than 2, for example.
We number crops from an original with the original's unique identifier followed by an underscore and a unique integer. For example, the Equus burchellii image I_JP2119_1 used above was cropped from I_JP2119
|
| Top |
|
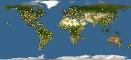
Global Mapper The Global Mapper was developed through a technical partnership between The Polistes Corporation and Topozone.com. Topozone provided base maps and aerial photographs from servers in Massachusetts using a total of approximately 20 terabytes of data. These include 1:1,000,000 scale maps of the world, 17 million topographical maps to 1:25,000 scale of the United States, and aerial photographs at 1 meter resolution covering 89% of the United States. Using Discover Life's servers, Polistes integrates distributional data onto these from participating databases, such as Missouri Botanical Garden's. In 2003, Sun Microsystems, Inc., gave The Polistes Foundation a generous equipment grant that included 10 processors to help Discover Life expand its network and serve its users from the University of Georgia and Missouri Botanical Garden, in North America, and the Agricultural Research Council, in Southern Africa. We seek additional partners to add more maps, photographs, databases, and regional servers to Discover Life. Functions
Browser requirements
Put maps on your site
The above was generated with the following HTML: Change 'Apis+mellifera' to the 'Genus+species' or to the 'Genus' that you wish to map. The width can be any size up to 720.
The above interactive map of Discover Life's network of study sites is embedded with the following HTML:
UTM
Put the particular Genus and species name in above for the kind you wish to display. Currently, through our partnership with
Missouri Botanical Garden, you can display distribution maps of many plants. As we integate additional databases, we'll
provide more species and more data for each.
Note that there is a "+" (plus sign) instead of a space in Genus+species name after kind=.
As above but separate name of each kind with comma.
Add &renew=1 to the URL to force the most recent data to be loaded from the database.
However, this is slower than if you use cached data, the default.
As above but separate name of each kind and databases with semicolons. In this case, the map would contain points from
MEI (Mandala, University of Illinois) and UGCA (Insect Diversity Project, University of Georgia) databases
for Genus species and from MO (Tropicos, Missouri Botanical Garden) for Genus2 species2. See Labels
for more details on this technology and participating databases.
|
| Top |
|
Checklists The names in a checklist may differ from those listed when you press the identify button after starting a guide. Checklists do not list different morphs and sexes as do the guides. Checklists may include kinds that are not in the guide. A kind must have at least one character-state attribute to appear in the guide. Kinds that have yet to be scored and have no attributes only appear in the checklist. Checklist are served to your browser as HTML. 20q builds HTML files from xml files. Use the following URL's to
When 20q refreshes a checklist, it shows in green what xml files it included in the html file and then displays the html file. |
| Top |
|
Species and higher taxon pages
Link to our species and higher taxon pages with the following: https://www.discoverlife.org/mp/20q?search=Genus+species (note the plus between the genus and species). https://www.discoverlife.org/mp/20q?search=Genus https://www.discoverlife.org/mp/20q?search=Higertaxon For example,
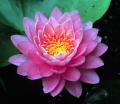
<img src="https://www.discoverlife.org/favicon.jpg"> yields our icon and a link to our species page for this flower:
|
| Top |
Thanks to Sam Droege, on 2 September, 2005, the USGS started a listserve for us to share thoughts and ask questions about IDnature guides. It is called guidetalk.
| Top |
|
Import -- how to get information from your databases into our tools Our goal is to enable you to use Discover Life's tools to process and share your information. The IDnature Guides (20q) and Record Manager (20l) have browser interfaces that enable contributors to enter and manage data manually via the Web. Here we discuss how to get information from databases into our tools. We consider |
| Top |
File format
We import images, text tables, XML files, and HTML files using various utilities into our tools.
Here we consider the simple case of importing tables. For more complicated cases, please contact
our support center.
Importing tables
Our IDnature Guide, Image Center, Record Manager tools import ASCII text tables.
They give data providers maximum flexibility and do not force them to use a rigorous data schema.
Providers name and order fields that they wish to share. The tools index key fields,
such as scientific name and geographic coordinates. They pass geographic information to the Global Mapper,
which in turn combines data from all contributors into maps.
They also integrate the information into the species pages served by the Search Box.
Here we describe how to format text tables from Excel, Access, and other databases so that we can import them. Each table requires the following format:
An example if a table with 4 columns that would plot two Quercus points in California:
___________________________
id$name$Latitude$Longitude
1$Quercus$37.8$-122.4
2$Quercus$33.5$-117.8
___________________________
An 8 column example:
___________________________
id$title$Latitude$Longitude$state$county$city$SourceURL^M
1$Golden Gate Bridge$37.81103$-122.47788$California$SanFrancisco$SanFrancisco$http://www.discoverlife.org Discover Life^M
2$Cresent Bay$33.54690$-117.80201$California$$Laguna Beach$http://whatever2...html Source^M
___________________________
Here we use Control-M to indicate the end of lines.
Note $$ in id=2, as no county for Long Beach is given.
Note the space after 'html' and before 'Source'.
Our tools treat certain fields in special ways. The following are used by the
We use the following options to transfer data:
Setting up new databases and automating updates
It is easy to import images and data into Discover Life. (Yeah, sure. Ha! Ha!)
This section is to help system operators working at Discover Life centers. While not quite black magic, it's not for data users, data providers, or the faint at heart. But no worries. By the time we've finished this documentation, the process may be automated and our operators out of a job.
Table name or URL:
If you have a single file to import, call the file $agent.txt, where $agent is your organization's unique code.
$agents must be named with capital letters and no spaces; usually abbreviation of institution or database compiler
This file can be put anywhere on the open Web. Alternatively, you can request an account on Discover Life and put it in your top directory.
Table format:
You must format tables as a text file with either tab or dollar signs separating fields.
For details on formatting the file and the fields that it must contain see File format above.
Crediting images and records:
Create a file called db/$agent/README to credit images and allow users to send feedback to data providers.
The README file has the following lines:
Formatting images to import:
Images must be formatted as a JPEG with file extension being in lowercase and the filename containing the $agent and a unique identifier (eg. I_SB98.jpg). If you can't rename your images with the $agent, we can do that for you, but you will have to assign a unique identifier to each image in the file name.
Steps are:
echo "START**************************`date`**********************************"
#Note new program
db/programs/web2db -w $agent #for I_RR: add -i to re-process images
chown -R polistes IM/db/$agent
chgrp -R nobody IM/db/$agent
chown -R polistes IM/$agent
chgrp -R nobody IM/$agent
echo "STOP**************************`date`**********************************"
| Top |
|
Scientific names Discover Life and its partners manage over 1.2 million valid scientific species names and 440,000 other names on-line. These are associated with over 10,000 family names that are part of our Tree of Life, which is based on The National Science Foundation's Assembling the Tree of Life project. They can also be accessed via our search box and by browsing All Living Things. We encourage taxonomists to contact us and use our tools to contribute and manage their scientific names, authorities, synonyms, references, and associated biological information. We also seek national, regional, and local checklists of names from surveys, inventories, and the published literature. We use such checklists to customize our IDnature guides by location at different geographical scales, including guides to local parks, nature centers, schools, and street addresses. We also add occurrence information from checklists to the maps displayed by the Global Mapper. As a free service, we use tools that reconcile checklist names with those in our authority files and provide feedback to our contributors so that they can update synonyms and correct misspellings. Using the same valid scientific name across databases is essential to our collective efforts to link checklists, identification guides, photographs, catalogs, specimen records, maps, and other information into pages on species and higher taxa. In addition to managing valid names, synonyms, homonyms, and vernacular names, Discover Life has built tools to manage morphospecies, temporary names that help users in the process of identifying specimens and describing species. Here are the rules that we follow in sharing names across databases.
|
| Top |
<parent id="$id" gmt="$when_gmt" ip="$ip">
<latitude>
$la
</latitude><longitude>
$lo
</longitude><accuracy>
$accuracy
</accuracy><elevation>
$elevation
</elevation>
<country>
$country
</country><state>
$state
</state><county>
$county
</county>
<city>
$city
</city><site>
$site
</site><position>
$position
</position>
<time1>
$time1
</time1><time2>
$time2
</time2><days>
$days
</days>
<who>
$who
</who><email>
$email
</email>
<how0>
$how0
</how0><how1>
$how1
</how1><how2>
$how2
</how2>
<how3>
$how3
</how3><how4>
$how4
</how4>
<habitat>
$habitat
</habitat><field_note>
$field_note
</field_note>
<note>
$note
</note>
</parent>
| Top |
|
Browsers
Discover Life's 20q software supports most recent browsers, including Internet Explorer version 4, Netscape version 6, and Mozilla version 1.0.2. There are a few bugs in recent versions of Internet Explorer (version 5 needs Flash) and Netscape (version 6 under Mac OS X) that cause some images not to appear in full color or at high resolutions. If you have problems, try using IE 4, which works on Windows and Mac platforms. Netscape 4 has problems with our interactive maps on Macs but version 4.7.6 works under Windows. Map targets do not display on any IE or Netscape version 3 or below. If you need to upgrade your browser, click here to upgrade to Firefox. |
| Top |
|
File transfer -- download ssh & scp If you are a data provider with an account on Discover Life, you will need ssh/scp communications software to login to our firewalls (upload.discoverlife.org) and transfer files. ssh lets you run commands on Discover Life servers. scp allows you to transfer files back and forth. For security reasons, we no longer support older protocols such as telnet and ftp.
|
| Top |
| Top |
| Discover Life | Albums | IDnature guides | Global mapper | Search | Top |


 -- move to the previous id.
 next
-- move to the next id.
next
-- move to the next id.
 Abelia chinensis